Deploy OpenNHP Binaries
OpenNHP is cross-platform software that is easy to deploy.
1. OpenNHP Component Overview
After following the build steps from the previous chapter, the build output is placed in the release directory. This directory contains three subdirectories for the three core OpenNHP components: nhp-agent, nhp-server, and nhp-ac.
nhp-agent (Agent): The module that initiates knock requests. Knock requests carry the identity and device information of the data accessor. Typically installed on end-user devices.
nhp-server (Server): The module that processes and validates knock requests. Usually runs as a server program. Its functions include validating knock requests, interacting with external authorization service providers for authentication, and controlling NHP-AC to open access.
nhp-ac (Access Controller): The access control enforcement module. Usually runs as a server program. This module enforces a default “deny all” security policy and ensures the protected resources remain invisible on the network. Typically located on the same host as the protected resources. Responsible for opening access to authorized NHP agents and closing access to agents that have lost authorization, executing pass-through actions based on parameters returned by the NHP server.
2. Development/Test Environment Setup
2.1 Environment: Windows/macOS Host + Linux Virtual Machines
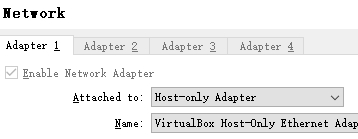
If your development host runs Windows or macOS, you can create a simple OpenNHP test environment by installing a virtualization environment (such as VirtualBox) and creating two Linux virtual machines. When creating virtual machines, set the network adapter option to "Host-only Adapter" (as shown below), which places the VM IPs in the same network segment as the development host.
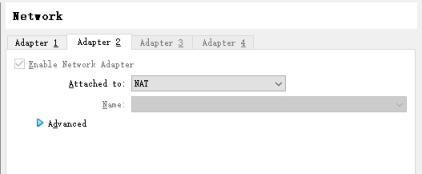
Tip: If you need the VM to also have internet access, you can add an additional "NAT" network adapter:
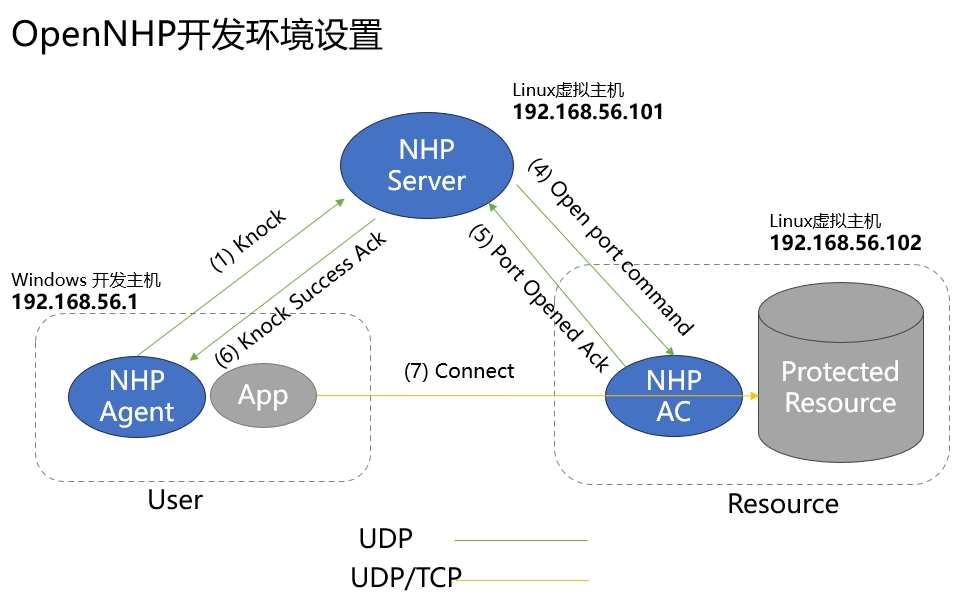
With this setup, the three NHP components are deployed as follows:
- [nhp-server] Runs on a Linux VM with IP address 192.168.56.101
- [nhp-ac] Runs on a Linux VM with IP address 192.168.56.102
- [nhp-agent] Runs on the Windows/macOS development host with IP address 192.168.56.1
2.2 Network Topology and Configuration
| Server Name | IP Address | Configuration |
|---|---|---|
| NHP-Server | 192.168.56.101 | Public Key: WqJxe+Z4+wLen3VRgZx6YnbjvJFmptz99zkONCt/7gc= Private Key: eHdyRHKJy/YZJsResCt5XTAZgtcwvLpSXAiZ8DBc0V4= Hostname: localhost ListenPort: 62206 aspId: example |
| NHP-AC | 192.168.56.102 | Public Key: Fr5jzZDVpNh5m9AcBDMtHGmbCAczHyPegT8IxQ3XAzE= Private Key: +B0RLGbe+nknJBZ0Fjt7kCBWfSTUttbUqkGteLfIp30= ACId: testAC-1 Protected resource resId: test |
| NHP-Agent | 192.168.56.1 | Public Key: WnJAolo88/q0x2VdLQYdmZNtKjwG2ocBd1Ozj41AKlo= Private Key: +Jnee2lP6Kn47qzSaqwSmWxORsBkkCV6YHsRqXCegVo= UserId: agent-0 |
Note: Each component has corresponding configuration files that must be configured correctly for successful startup. See the “Configuration Files” sections below for each component.
Tip: Starting from version 0.3.3, most fields in configuration files support dynamic updates. See the comments in each configuration file for details.
2.3 NHP-Server Configuration and Deployment
2.3.1 NHP-Server System Requirements
- Linux server or Windows
2.3.2 Running NHP-Server
Copy the nhp-server directory from the release folder to the target machine. Configure the toml files in the etc directory (see next section for detailed parameters), then run nhp-serverd run.
Linux:
nohup ./nhp-serverd run 2>&1 &Windows:
nhp-serverd.exe run
[Optional] Hide UDP port exposure by running iptables_default.sh
2.3.3 NHP-Server Configuration Files
- Base configuration: config.toml
- Access Controller peer list: ac.toml
- Agent peer list: agent.toml
- HTTP service configuration: http.toml
- Server plugin configuration: resource.toml
- Source IP mapping list: srcip.toml
2.4 NHP-AC Configuration and Deployment
2.4.1 NHP-AC System Requirements
Linux server with kernel support for ipset. Check ipset support with:
lsmod | grep ip_set
2.4.2 Running NHP-AC
Copy the nhp-ac directory from the release folder to the target machine. Configure the toml files in the etc directory (see next section for detailed parameters). Run iptables_default.sh to add firewall rules—at this point, external connections will be blocked. Then run nhp-acd run.
Note: Both nhp-acd and iptables_default.sh require root privileges.
Linux:
 su
 ./iptables_default.sh
 nohup ./nhp-acd run 2>&1 &
To revert the iptables changes made by iptables_default.sh, run:
iptables -F
2.4.3 NHP-AC Configuration Files
- Base configuration: config.toml
- Server peer list: server.toml
2.5 NHP-Agent Configuration and Deployment
2.5.1 NHP-Agent System Requirements
- All platforms: Windows, Linux, macOS, Android, iOS
2.5.2 Running NHP-Agent
Copy the nhp-agent directory from the release folder to the target machine. Configure the toml files in the etc directory (see next section for detailed parameters), then run nhp-agentd run.
Linux:
nohup ./nhp-agentd run 2>&1 &Windows:
nhp-agentd.exe run
2.5.3 NHP-Agent Configuration Files
- Base configuration: config.toml
- Knock target configuration: resource.toml
- Server peer list: server.toml
2.6 Testing NHP Network Stealth
To verify NHP network stealth, perform an nmap scan (using port 80 as an example) from the nhp-agent host (IP: 192.168.56.1) against the nhp-ac host (IP: 192.168.56.102). You can also perform scans from another VM (simulating an attacker) to observe the stealth effect.
| Test Case | Command | Purpose | Expected Result |
|---|---|---|---|
| nhp-agent not running | nmap -sS -p 80 192.168.56.102 | Test AC stealth from Agent | 80/tcp filtered |
| nhp-agent running | nmap -sS -p 80 192.168.56.102 | Test AC access for Agent | 80/tcp open |
| nhp-agent running | nmap -sS -p 80 192.168.56.102 | Test AC stealth from attacker | 80/tcp filtered |
3. Docker Deployment (Quick Method)
For rapid setup and testing, OpenNHP provides a Docker-based deployment option.
3.1 Prerequisites
3.2 Quick Start Commands
# Clone the repository
git clone https://github.com/OpenNHP/opennhp.git
cd opennhp

# Build the base image
cd docker
docker build --no-cache -t opennhp-base:latest -f Dockerfile.base ../..

# Start all services
docker compose up -d
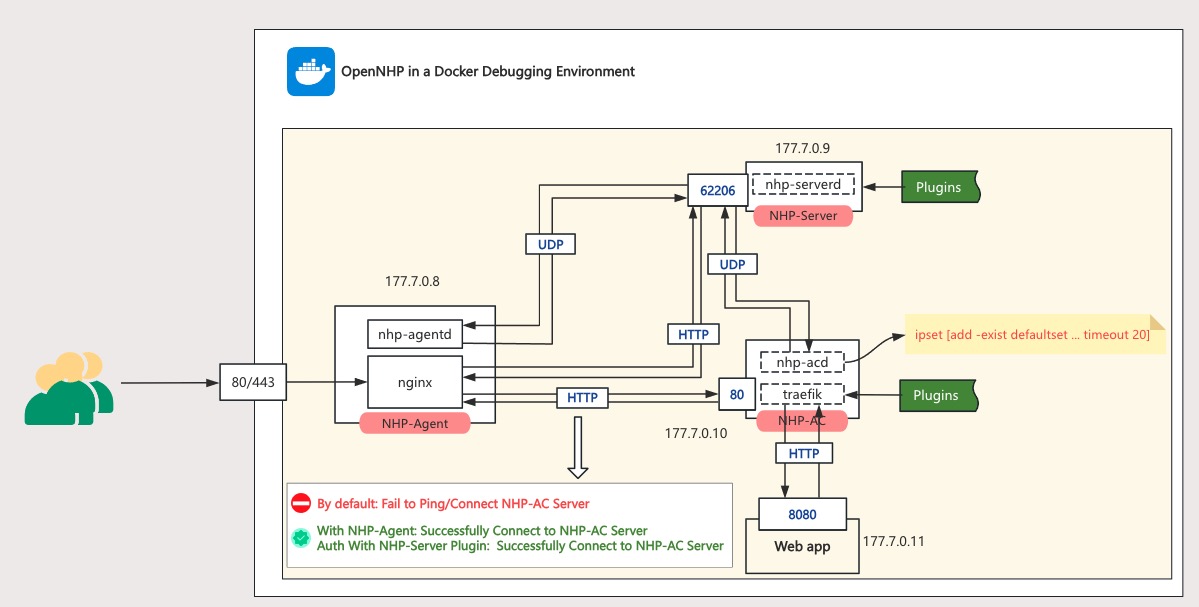
3.3 Docker Network Topology
| Container | IP | Description |
|---|---|---|
| NHP-Agent | 177.7.0.8 | Runs nhp-agentd & nginx |
| NHP-Server | 177.7.0.9 | Runs nhp-serverd on port 62206 |
| NHP-AC | 177.7.0.10 | Runs nhp-acd & Traefik |
| Web App | 177.7.0.11 | Protected application on port 8080 |
For detailed Docker testing scenarios and verification steps, see the NHP Quick Start Guide.
4. Production Deployment Considerations
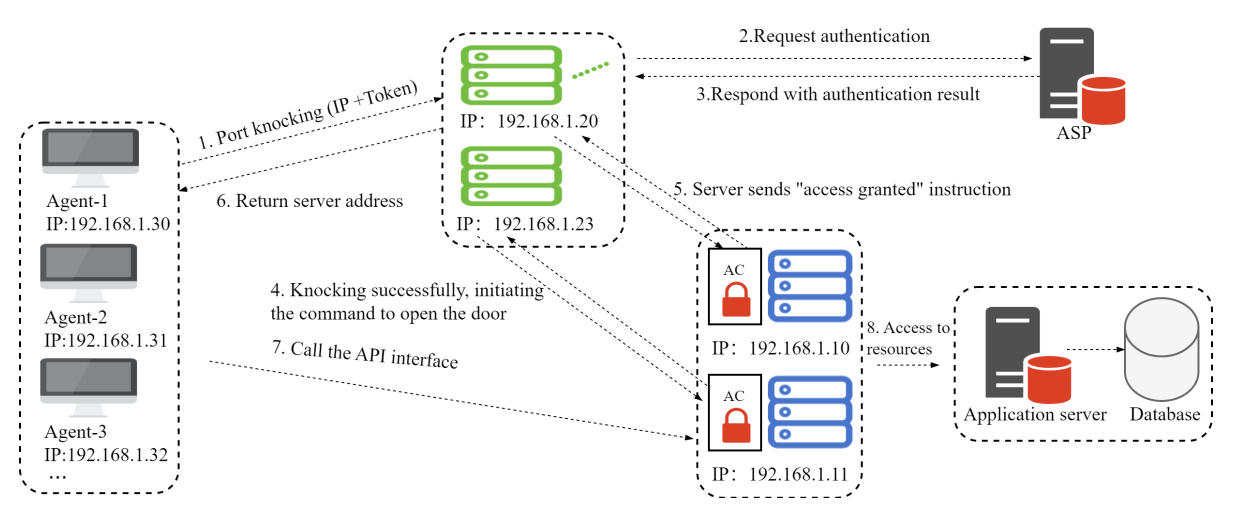
4.1 Architecture Overview
For high-availability deployments, consider:
4.2 Security Hardening
- Key Management
- Generate unique keys for each component using
nhp-serverd keygen,nhp-acd keygen,nhp-agentd keygen - Never reuse keys across environments
- Rotate keys periodically and update peer configuration files
- Generate unique keys for each component using
- TLS Configuration
- Enable HTTPS in
http.tomlwith valid TLS certificates - Configure
TLSCertFileandTLSKeyFilepaths - Use certificates from a trusted CA for production
- Enable HTTPS in
- Network Security
- Run
iptables_default.shbefore starting NHP-AC to ensure deny-all policy - Consider eBPF/XDP mode (
FilterMode = 1) for high-performance packet filtering - Restrict management interfaces to internal networks only
- Run
4.3 Deployment Checklist
Pre-deployment:
- Keys generated for all components
- Peer public keys exchanged and configured
- Configuration files validated
- TLS certificates in place (for HTTPS)
- System time synchronized across all hosts
Post-deployment:
- Verify NHP-Server is listening on UDP 62206
- Optional, only after assessing the flood trade-off below: for a host-network or bare-metal server, run
sudo env NHP_TRUSTED_PEERS="<AC-IP> <relay-IP>" docker/harden_nhp_server_udp.shto raisermem_maxand install aggregate kernel rate limits for both IP families after trusted-peer exemptions. Restart nhp-server after raising the ceiling. Docker Compose passes the requested socket size to the server, which warns if the host ceiling clamps it; Compose does not mutate the host’s non-namespacednet.core.rmem_max. - Verify NHP-AC iptables rules are active (
iptables -L) - Test knock sequence from NHP-Agent
- Verify stealth with nmap from unauthorized host
- Check log files for errors
4.4 Configuration Parameters Reference
Key configuration parameters across components:
| Parameter | Component | Description |
|---|---|---|
PrivateKeyBase64 | All | Private key (static, requires restart). Either a plain base64 key or a sealed blob (v1$…) produced by <daemon> seal; a sealed blob is decrypted at startup with a passphrase from NHP_KEY_PASSPHRASE_FILE (preferred) or NHP_KEY_PASSPHRASE. On nhp-agent specifically, “startup” also covers RestartAgent/rotate (both re-run Start in the same process), so the passphrase must stay resolvable for the whole process lifetime, not just its first boot — a passphrase file that disappears after the initial start still yields an agent that starts fine but can never restart or rotate. See the per-daemon config.toml comments. |
ListenPort | Server | UDP listening port, default 62206 (static) |
LogLevel | All | 0=silent, 1=error, 2=info, 3=audit, 4=debug, 5=trace |
DefaultCipherScheme | All | 0=Curve25519, 1=SM2 |
FilterMode | AC | 0=IPTables, 1=eBPF/XDP |
ExpireTime | Peer configs | Epoch timestamp when peer key expires |
Most configuration fields support dynamic updates without restart. See configuration file comments for details.
5. Logging
5.1 Log File Locations
Log files are generated in each component’s logs directory, named by date. View logs using tail:
NHP-Server logs:
tail -f release/nhp-server/logs/server-2024-03-10.logNHP-AC logs:
tail -f release/nhp-ac/logs/ac-2024-03-10.logNHP-Agent logs:
tail -f release/nhp-agent/logs/agent-2024-03-10.log
5.2 Log Format
Log format:
Timestamp CodeLocation ComponentName [LogLevel] LogMessage
Log levels:
- Error
- Critical
- Warning
- Info
- Debug
6. Troubleshooting FAQ
Q: Windows build error:
running gcc failed: exec: "gcc": executable file not found in %PATH%A: GCC compiler is not installed. Follow the GCC installation steps in the build documentation.Q: Log shows error:
NHP-AC [Critical] received stale packet from 192.168.56.101:62206, drop packetCause: The receiver requires packets to be received within 10 minutes of being sent. Fix: Synchronize system time between machines.Q: How do I adjust the access duration after authentication? How do I restrict access to specific ports? A: In the corresponding plugin module under
nhp-server/plugins/, findetc/resource.toml. This file configures resource ports, duration, ID, etc. For nhp-agent knocking, the default plugin isexample. For WeChat QR code knocking, use thewxwebplugin.Q: How do I verify configuration is working? A: Check server and AC logs. You can also run
ipset -Lon the AC to view authorized source IPs, destination ports, and durations.Q: nhp-agent knock succeeds but cannot access the resource. Possible cause: The resource target IP in the ipset record added by nhp-server to nhp-ac doesn’t match the requested resource. This can occur when the resource and nhp-ac are on the same server.
Manual ipset rule for debugging:
sudo ipset add defaultset [SourceIP],tcp:80,[ResourceIP]- SourceIP: The agent’s public IP (verify via tcpdump or ipset list)
- ResourceIP: The resource IP from
nhp-server/plugins/example/etc/resource.toml
If the IPs don’t match, knocking succeeds but access fails.
Debug with packet capture on nhp-ac:
tcpdump -i any port 80Solution: Configure the correct IP in
nhp-server/plugins/example/etc/resource.tomlunderAddr.Ip.
Data object identifiers and key files
DoIds must be 1..64 ASCII letters, digits, underscores, or hyphens. UUIDs remain valid. Rename or migrate objects that used other identifiers before upgrading; unsupported IDs are rejected before filesystem access. Newly created private-key files use mode 0600 and new key directories use 0700. Existing key files retain their old permissions; restrict those permissions as part of the host upgrade.
UDP host firewall sizing
For a host-network or bare-metal server, run:
sudo env NHP_TRUSTED_PEERS="192.0.2.10 2001:db8::10" NHP_UDP_RECV_BUFFER_BYTES=8388608 docker/harden_nhp_server_udp.sh
Replace these example addresses with the AC, relay, and peer-server addresses (or narrow CIDRs) before use. These peers bypass the rate bucket in both IP families, but still pass through the remaining host INPUT rules. Protect these source addresses with network anti-spoofing rules. The script requires iptables, ip6tables, sysctl, and Python 3, and refuses to run without a trusted peer list. Docker bridge deployments need equivalent rules in their own packet path.
The fixed-size aggregate bucket defaults to 5,000 packets/s and a 10,000-packet burst per IP family, shared by all untrusted clients. Set NHP_KNOCK_GLOBAL_RATE_PPS and NHP_KNOCK_GLOBAL_RATE_BURST from measured host capacity and expected peak traffic. A single source sending at the configured rate can deny all new untrusted traffic. There is no kernel per-source table to exhaust and no separate small per-IP cap that penalizes NAT clients. Authenticated peer separation and the server’s userspace limits remain necessary.
NHP_UDP_RECV_BUFFER_BYTES sets the server receive-buffer request (default 8 MiB; range 65,536 to 1,073,741,823 bytes). Run the script before starting or restarting nhp-server: changing net.core.rmem_max does not resize an open socket. The script’s sysctl and firewall changes do not survive reboot unless your host configuration manager persists them. Inspect drop counters with sudo iptables -vnL NHP_KNOCK_GUARD and sudo ip6tables -vnL NHP_KNOCK_GUARD.
The helper only raises rmem_max; it never lowers an existing host ceiling. Pass NHP_UDP_RECV_BUFFER_BYTES explicitly through sudo env if the server uses an override (including a Compose .env value). Trusted CIDRs must have no host bits and must be at least /24 (IPv4) or /64 (IPv6). Rules are tested before each family is committed atomically with iptables-restore --noflush. The limit module quantizes rates; use divisors of 10,000 for exact nominal rates. The helper accepts at most 10,000 pps and a burst of at most 10,000 packets and at most 60 seconds of traffic. Larger deployments need an independently sized upstream filter.
The optional aggregate firewall guard sets a ceiling on host packet work; it is not per-client fairness. A single source can consume that ceiling and deny all new agent knocks until the flood stops. Leave this helper disabled if upstream DDoS filtering does not control that risk; the server cookie and overload checks remain available. Loopback traffic is exempt before rate checks, as are the configured infrastructure peers. Firewall replacement is atomic per IP family, not across IPv4 and IPv6; an apply failure reports which family was updated.
A trusted relay exemption also bypasses the kernel bucket for all agent traffic forwarded by that relay. Apply ingress flood control at the relay/upstream network and retain server-side per-client limits. The helper does not inspect encapsulated client identities. Only enable it after sizing and accepting both this relay bypass and the aggregate direct-client denial threshold.
ART replay protection
Keep AC and server clocks synchronized: ART responses may be up to 600 seconds old or 300 seconds in the future. The cache retains authenticated AC tuples for 960 seconds. Set ARTReplayCacheEntries to peak ART/s times 960 plus burst headroom (0 selects 100,000; maximum 1,000,000; restart required). Memory grows with usage up to that cap, at several hundred bytes per entry. Alert on nhp_server_art_replay_cache_evictions_total; unexpired eviction shortens replay coverage. Detailed clock-skew and replay warnings are limited to once per minute.
Only configured AC keys can populate this cache. ART validation does not change the shared AOL timestamp watermark or clear connection threat state. Cache state is process-local and clears on restart. Random transaction sequences make ID reuse unlikely; the cache is additional duplicate-delivery protection. AOP protection must be configured on the AC separately.